
Guide to EndNote
This guide will walk you through the basics of setting up and using EndNote. Happy referencing!
EndNote is a powerful reference management software that helps you collect, organize, and maintain a library of references, find and save full-text journal articles and books, and insert formatted references into your documents. Start by watching the video below to get an overview of the core functionality of EndNote.
As a student you have the possibility to download and install the application. Access through the link below requires SEDU account login.
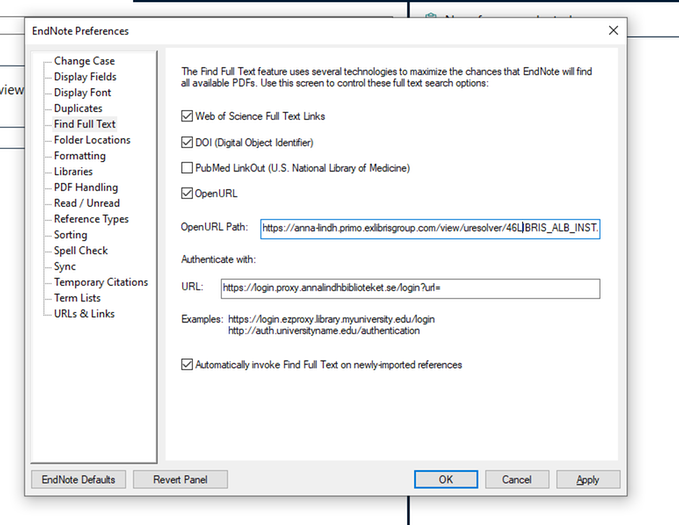
To get Endnote to acquire and download fulltexts to Anna Lindh library e-resources you need to make some configuration. See image below
- Go to Edit > Preferences > Find full text
- In the field OpenURL Path write: https://anna-lindh.primo.exlibrisgroup.com/view/uresolver/46LIBRIS_ALB_INST/openurl?
- In the field URL write: https://login.proxy.annalindhbiblioteket.se/login?url=
- Click Ok.

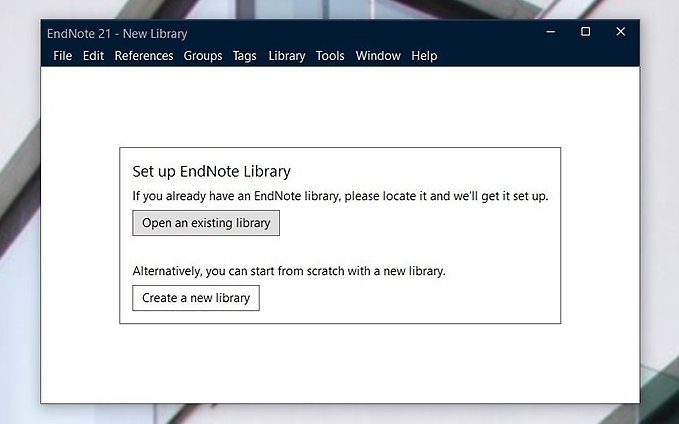
When you first open EndNote, you will be prompted to create a library. A library is a collection of references and associated PDFs. Follow these steps:
- Choose "Create new library."
- Select a location on your computer to save your library files. It is a good idea to create a dedicated folder for you EndNote library files.
Important Tips:
- Work with only one library to avoid complications or file corruption.
- Do not store your library on cloud services or flash drives to reduce the risk of file corruption.
- Libraries can be synced and backup to the cloud using EndNote’s sync-function (more on this further down).
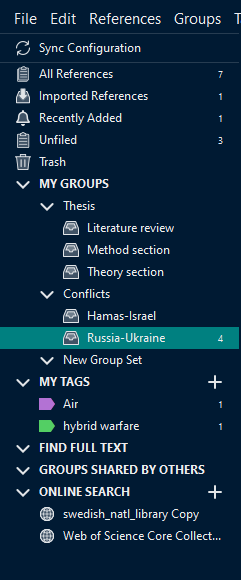
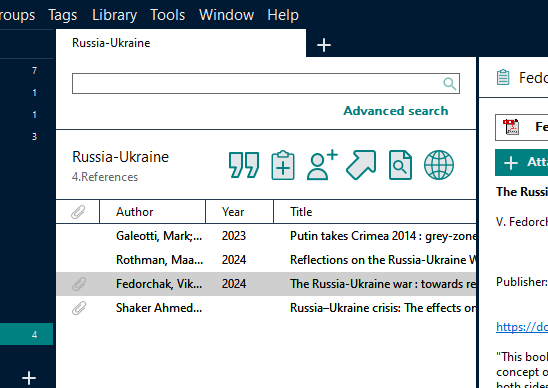
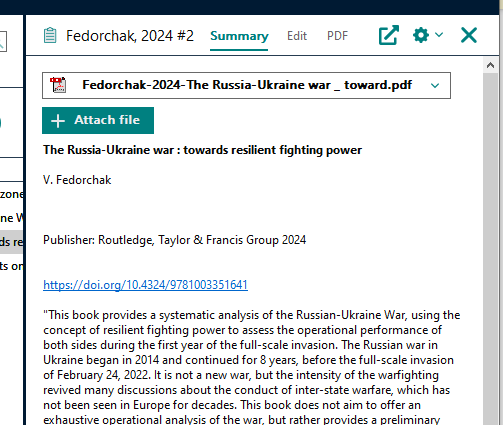
The EndNote interface consists of three main areas (see figures):
1. Navigational Bar (Left Side): You filter, manage, and organize your references here. Use the "Groups" function to create folders for different projects or topics and consider creating subgroups for better organization. You can also view any “tags” you have made and attached to references. You may also access “shared groups”, collections of references shared by multiple users. You can also access and search journal databases under “online search”.
2. Reference Overview (Middle Section): Gives you an overview of your references included in groups, tags, or that are unfiled. Utilize the search bar on the top to search for specific references. Here you also find buttons for cutting out and inserting a reference into a document, adding new references, sharing groups, exporting library, as well as online lookup of references associated PDF’s.
3. Reference Summary (Right Side): View details about the selected reference, including the title, abstract, and links to PDFs. You can also edit reference information here by selecting the “edit” tab.
To use EndNote your library must be filled with references. There are four main methods to import references into EndNote:
1. Exporting from Databases: Most databases allow you to select references and export them directly to EndNote.
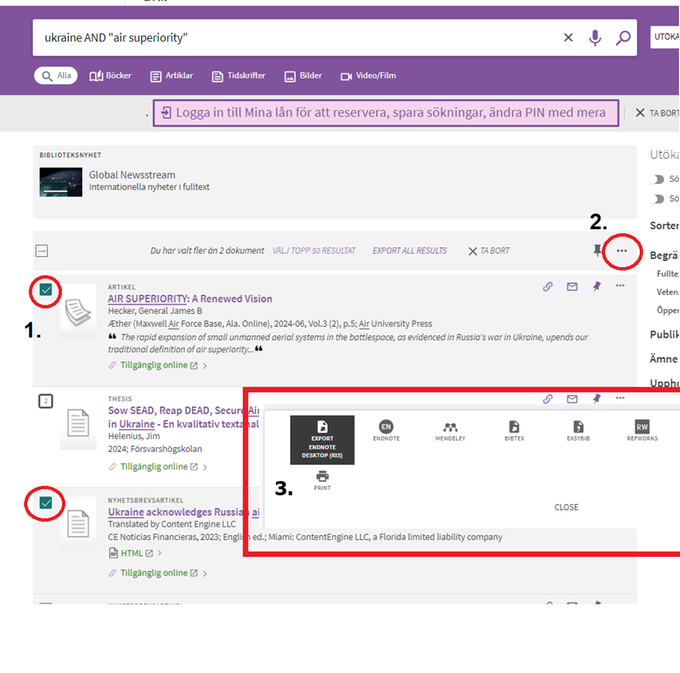
For instance, in the Anna Lindh Library catalog (Primo), you may select one or more references, then click the three dots at the top of the list of search results and select “Export EndNote Desktop (RIS)”. This will download a file containing the selected references, when opened these should import into EndNote automatically.
2. Importing PDFs: References to academic books and papers can be created by importing PDF-files. Go to “File” -> “Import” -> “File” (for single PDFs) or “Folder” (for multiple PDFs). This will work for most books and papers containing DOI links (e.g. dx.doi.org/ 10.4324/9781003351641).
If the PDF does not contain a DOI, Endnote will create a blank reference containing only the file name of the PDF file in the title field. The PDF will be attached to this blank reference.
Tip: You can make blank references complete by editing the reference and adding a DOI link in the corresponding field. After editing, right-click the reference and select” Find Reference Update”. EndNote will now add the missing information to the reference.
3. Creating References Manually: If you cannot find a reference in a database or through PDF import, you can create it manually within EndNote. Go to “References -> “New Reference”. Select the corresponding reference type and fill in the necessary information. You may also attach a PDF to your reference by selecting the PDF tab. When all is done, press “Save” then close the window.
Tip: Create references manually to store and reference interviews or other unpublished content.
4. Searching Databases via EndNote’s “Online Search”: Searches can be conducted from within EndNote and references can be added by selecting the relevant references and pressing the plus icon. However, search functions and databases are limited. Therefore, this option is most suitable for basic look-up searches.
EndNote is fully integrated with MS Word, allowing you to insert formatted references easily:
- Insert Citations: In MS Word, Click the EndNote 21 tab and select “Insert Citation.” Search for the reference you want in the dialogue window and click “Insert.” This adds an inline citation and a bibliography at the end of your document.
- Editing References: Click on a reference in your document and select “Edit & Manage Citation” to make changes, such as adding page numbers.
- Changing Reference Styles: You can easily change the citation style (e.g., APA, Harvard) from the EndNote 21 tab, and it will reformat all references in your document accordingly.
- Working with footnotes: If your reference style uses footnotes, you first have to add a blank footnote via “References” -> “Insert footnote”, place your cursor within this footnote, and then insert the citation from the EndNote 21 tab as described above.
Making use of EndNotes sync function enables you to back up and access your library via EndNote online and across devices. It also enable you to share groups of references between users – ideal if you are collaborating with others.
Select “Edit” -> “Preferences” -> “Sync” and press “Enable sync”. You will now be asked to create and account for EndNote Online.
Set up your account using your FHS-email (e.g. firstname.lastname@student.fhs.se)
EndNote is set up to sync libraries between desktop and online versions every 15 minutes. If you wish to force EndNote to sync between platforms click “sync” in EndNote Desktop and sync now.
With sync set up you can share groups of references with others. To do this select and right-click the group you wish to share. Select “share group”. You will then be asked to add email addresses to the people you wish to share your group with.
Further settings detailing permissions for group members can be found in EndNote Online. Remember to sync if references are not shared instantly between group members.
“Find Full Text” is a function within EndNote used to locate and attach full text PDFs for references. It is reliant on connecting EndNote with Anna Lindh Library’s subscription access to academic databases, books and journals.
To set up Find Full Text enter credentials via “Edit” -> “Preferences” -> “Find Full Text”, then add the following information:
- Open URL Path: https://anna-lindh.primo.exlibrisgroup.com/view/uresolver/46LIBRIS_ALB_INST/openurl?
- URL: https://login.proxy.annalindhbiblioteket.se/login?url=
By ticking the box “automatically invoke find full text on newly-imported references” EndNote will attempt to find a full-text PDF and attach it to any imported reference.
This guide is meant to help you get started using EndNote 21. If you wish to learn more, please visit the more detailed guides listed below.
- Karolinska Institutet University Library offer detailed guidance for both EndNote 21 and EndNote Online.
- Access the official EndNote help pages